
Comparing Gloss and Matte Finish Renders Under Consistent Lighting
A gloss render and a matte render are most useful when the camera, geometry, crop, background, lighting, exposure, and display treatment remain unchanged. Choose the finish direction that makes the current review question easier to inspect.
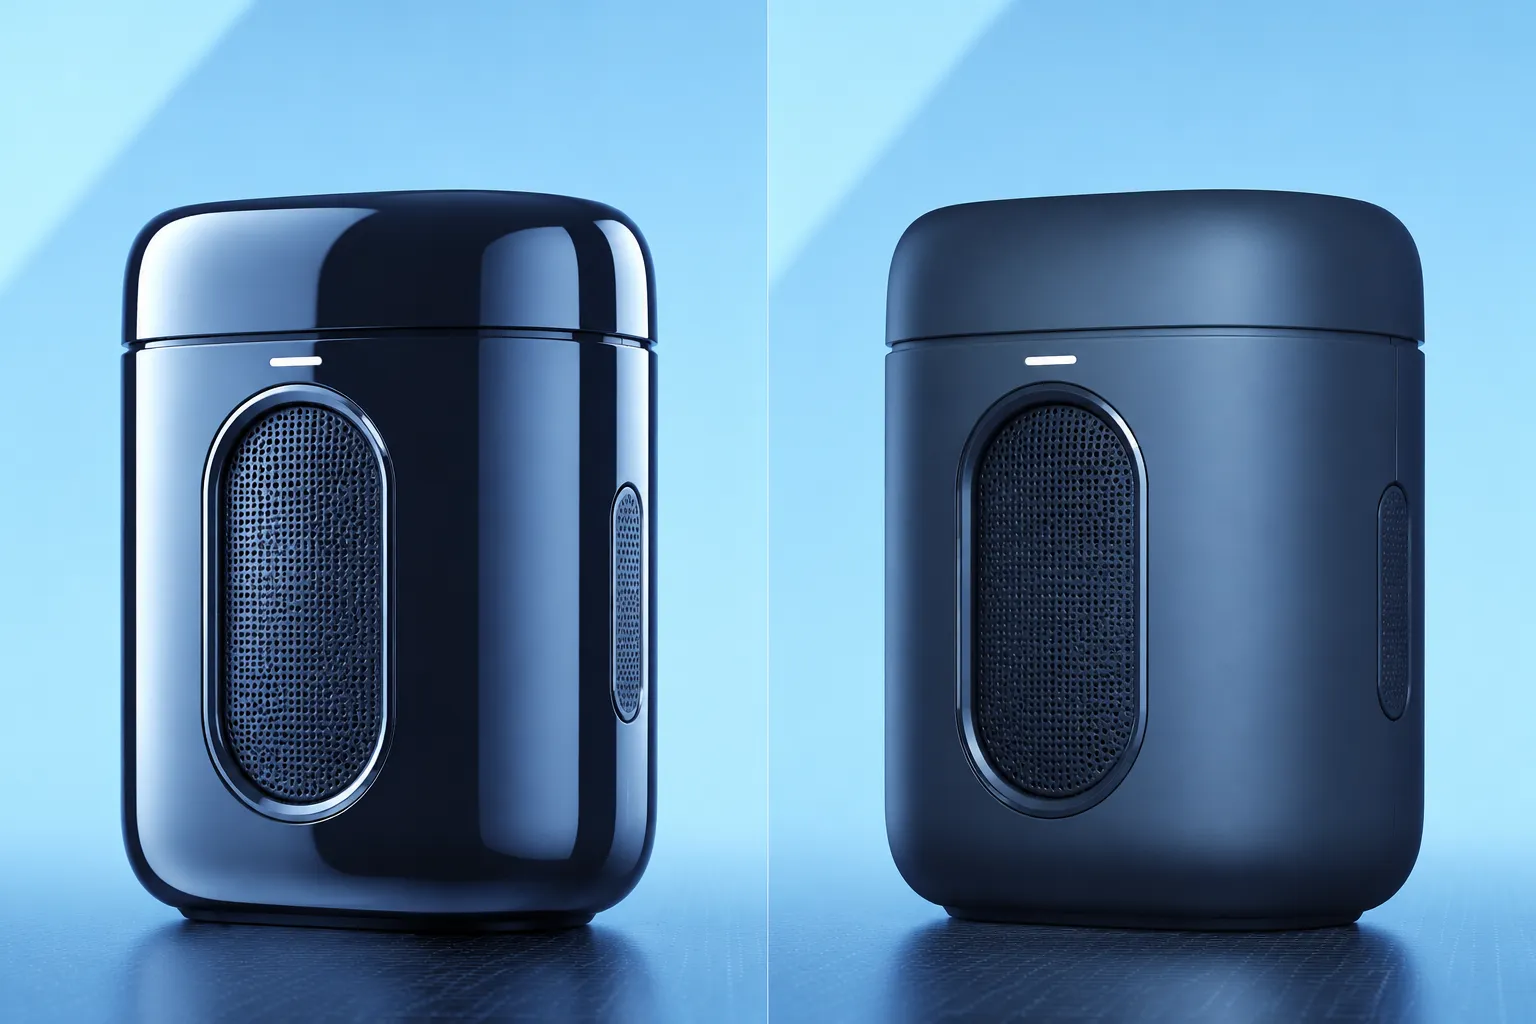
That choice concerns presentation evidence, not physical accuracy. The comparison can clarify surface flow, silhouette, edge breaks, and transitions while leaving roughness, coating behavior, dimensions, manufacturing, safety, and physical performance unresolved.
What to Keep Consistent
Only the intended finish direction should change between the paired images. Hold these conditions steady:
- Camera position, focal length, and viewing angle
- Object scale, framing, and crop
- Model geometry and visible details
- Background and floor context
- Light positions, sizes, and intensities
- Exposure, tone mapping, and color treatment
- Render resolution and display size
Place both renders side by side at the same size. A shared crop makes silhouette, massing, edge breaks, and transitions easier to trace. If the camera or model changes, a reviewer may attribute a shape difference to the finish.
Gloss vs Matte Render: The Direct Comparison
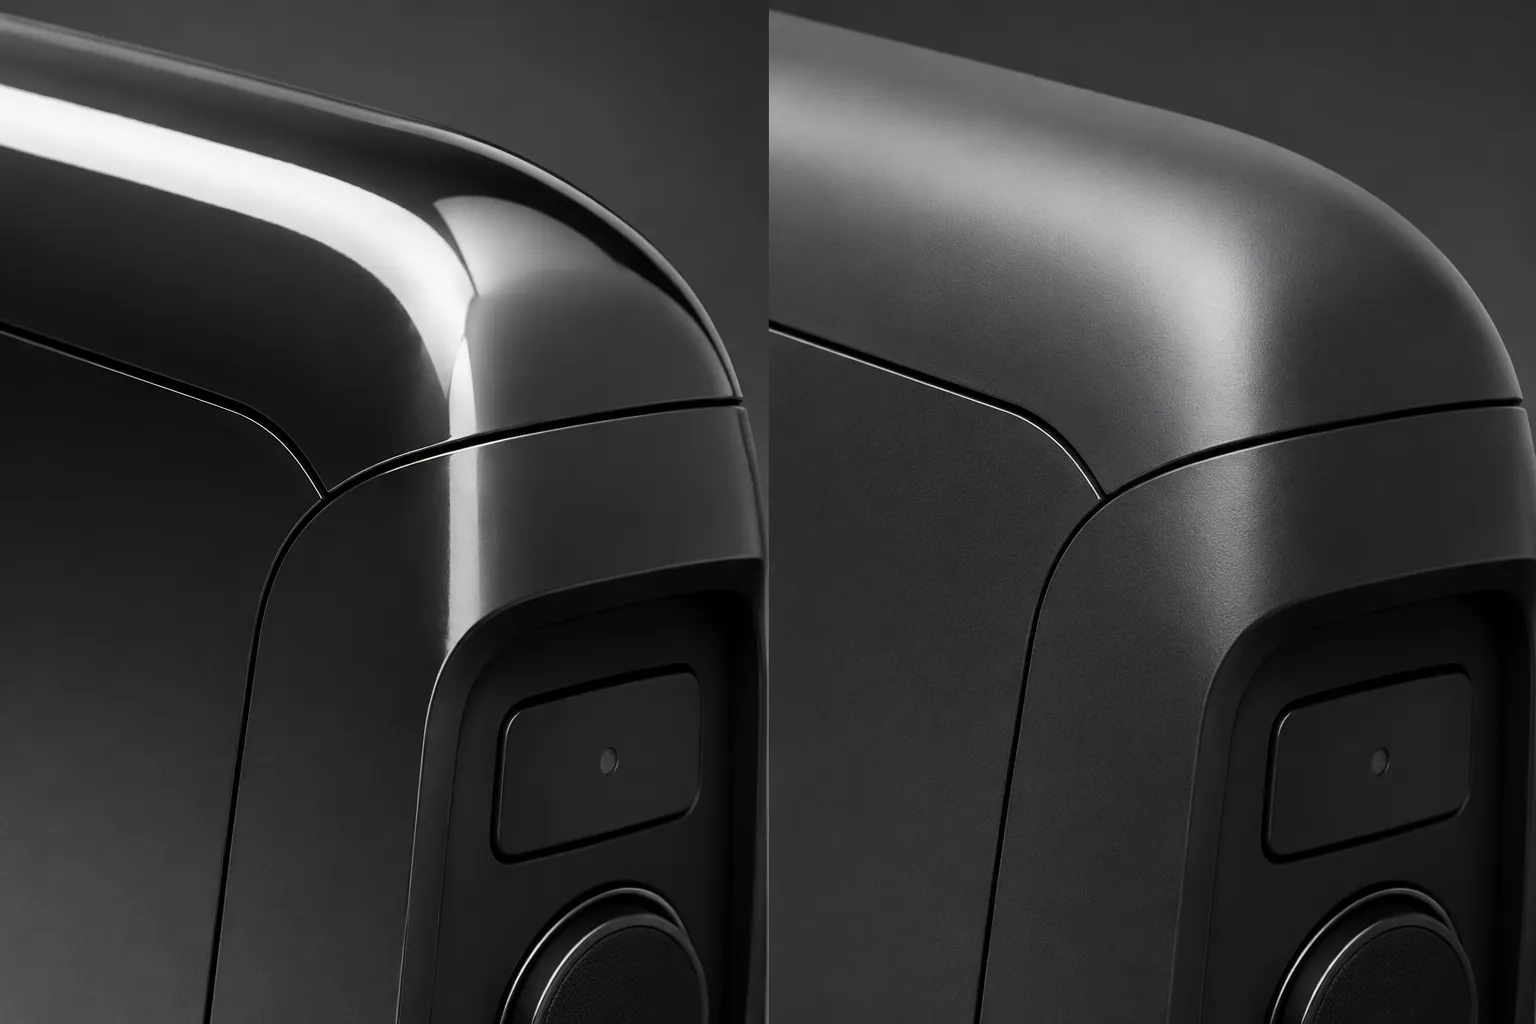
A gloss direction produces stronger reflections and more concentrated highlights. When a highlight follows the form cleanly, it can make curvature, continuity, and broad surface transitions easier to locate.
The same reflection can dominate the image. A bright band may hide a shallow transition, make a flat panel appear curved, or compete with controls and labels. Gloss can therefore clarify surface flow while reducing access to local detail.
A matte direction softens sharp reflected structure and usually presents broader tonal changes. This can support silhouette, proportion, massing, and large plane comparisons without one bright reflection controlling the reading.
Matte can also reduce separation between adjacent surfaces. Small edge breaks, shallow curvature, and subtle panel changes may merge when their tonal difference is limited.
- Use the gloss direction when highlight flow helps explain curvature, continuity, or surface tension.
- Use the matte direction when reflections distract from silhouette, proportion, or broad massing.
- Keep both when the review covers both form communication and surface-flow questions.
- Record the visible feature that led to the choice instead of naming one finish universally better.
Inspect Highlight Behavior First
In the gloss render, inspect the highlight as a shape moving across the object. Its brightness is less useful than its path, continuity, and interference with the form.
- Does the highlight follow the intended curvature?
- Does it break at a meaningful edge?
- Does it remain continuous across adjoining surfaces?
- Does it reveal or hide a transition?
- Does it suggest a seam that is absent from the model?
- Does it overwhelm nearby controls or other details?
- Does it change abruptly without a visible geometric reason?
A continuous highlight may support a reading of smooth visual flow. A broken highlight may make an edge break or change in plane easier to inspect. Both are observations about the rendered image.
Do not treat highlight brightness as a measurement of physical gloss. The render introduces a particular lighting and display condition that can exaggerate or suppress apparent finish.
Check Edge and Transition Readability
Edges establish where one plane ends and another begins. In a concept render, they also carry much of the evidence used to discuss chamfers, radiused corners, bezels, housing breaks, panel transitions, and raised or recessed features.
Gloss often shows an edge through a narrow highlight or sharp tonal change. The reflection can make a boundary easy to find, but it can also become the boundary in the viewer's interpretation. Trace important edges against the model view or CAD reference before treating them as geometry.
Matte tends to show edges through changes in lightness rather than sharp reflection. This may support a calmer silhouette comparison, but it can flatten small transitions. If a feature disappears in the matte version, record it as low-contrast in the presentation rather than absent from the object.
For broad transitions, inspect the reflection path in the gloss version:
- Where does the reflected band bend?
- Does its width change gradually?
- Does the reflection stop where the surface changes?
- Does the highlight hide a shallow step?
- Does the transition remain visible from another angle?
In the matte version, inspect the tonal gradient:
- Is there enough contrast between adjoining planes?
- Does the transition remain visible without a reflection?
- Does even lighting make the surface appear flat?
- Is a darker region caused by form or by the surrounding setup?
- Does the feature survive a smaller presentation size?
A transition that reads clearly in one finish and weakly in the other is a review consequence worth recording. It does not establish how a physical finish will behave.
Compare Silhouette and Surface Separation
Silhouette depends less on surface finish than local reflection, but finish can still affect how confidently the boundary is perceived. Compare the paired renders at a reduced size and inspect overall width, height, protrusions, corner radius, base-to-top relationship, and negative spaces.
If the silhouette changes between images, the comparison is not isolated to finish. If the silhouette stays constant but one version reads more clearly, the difference belongs to presentation visibility. Route questions about proportion or clearance to the model or engineering review.
Surface separation concerns the distinction between neighboring panels, materials, controls, inserts, or finish regions. Gloss may create strong separation through reflected contrast. Matte can show whether that boundary depends on geometry, color, a shadow, or a highlight effect.
If adjacent areas merge in the matte render, identify the missing cue: color difference, plane change, edge break, shadow, texture indication, or reflected-image contrast. A boundary visible only through a moving highlight may need a clearer model feature or annotation before handoff.
Match the Finish to the Review Question
When gloss supports the review
A gloss direction can help inspect whether an outer shell turns smoothly, whether primary planes connect, whether a radius continues around a corner, and whether a broad surface carries coherent visual flow.
Annotate the relevant reflection path. State what the highlight reveals and what it leaves unresolved. The render communicates a surface direction; it does not establish a coating specification or confirmed physical performance.
When matte supports the review
A matte direction can make silhouette, massing, proportion, large plane relationships, control placement, and broad transition locations easier to compare.
Matte is not automatically neutral. An even lighting setup may remove the tonal variation needed to read curvature, while a darker or lighter treatment may change separation between planes. If a feature disappears, record whether the cause is finish contrast, light direction, image scale, or unresolved geometry.
Common Misreadings
“The brighter highlight is the more accurate finish.”
Brightness belongs to the displayed image under its chosen conditions. Inspect the highlight's shape, continuity, and interference with the form instead. A bright reflection has limited decision value if it does not clarify the review question.
“Matte renders show the true shape.”
Matte can reduce reflection distraction, but it can also suppress useful surface separation. Shape readability still depends on camera, geometry, lighting, contrast, and image scale. Compare the matte render with the model view or another angle before treating a soft transition as a geometric conclusion.
“A consistent setup removes all uncertainty.”
A fixed setup improves comparability. It does not remove the effects of viewing angle, background, display treatment, or the limits of the concept model. Consistency makes visible differences easier to attribute; it does not turn the render into physical evidence.
“One finish should be used for every review.”
Different finishes expose different visual cues. A direction that supports silhouette review may be weaker for surface-flow review. Choose according to the decision being made, and retain both views when the review spans multiple questions.
A Compact Review Method
- Confirm that camera, geometry, crop, lighting, and image treatment match.
- Compare the silhouette at the same display size.
- Trace the main highlight or tonal gradient across the largest surfaces.
- Mark each edge break that becomes clearer or weaker.
- Inspect shallow transitions and adjoining panels.
- Check controls, labels, and scale cues for visual separation.
- Separate observed image behavior from inferred material behavior.
- Record which finish supports the current review question and why.
- Route unresolved geometry, material, and production questions to the appropriate review.
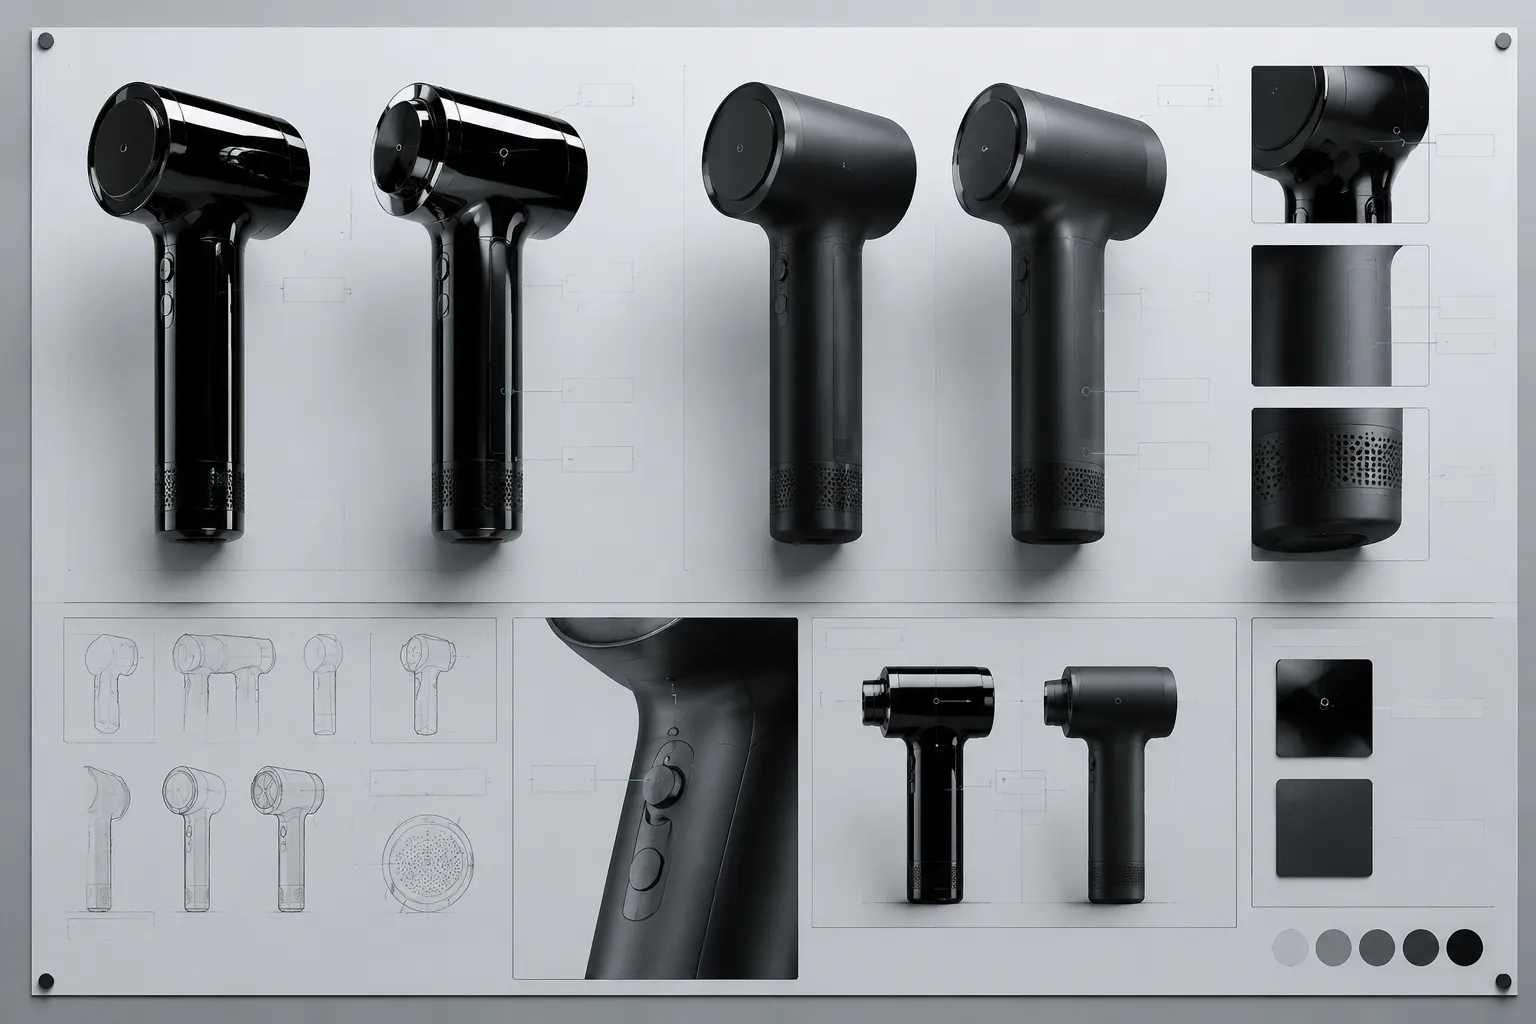
The gloss direction makes the outer shell transition easier to trace, but its reflection obscures the recessed control area. The matte direction improves control separation and silhouette review. Keep the matte preview for proportion discussion and retain the gloss preview for surface-flow discussion. Physical finish behavior remains untested.
What the Render Cannot Confirm
A matched gloss and matte comparison cannot confirm physical surface roughness, measured gloss or haze, coating durability, refractive or reflective material properties, dimensional accuracy, mechanical operation, ergonomic suitability, manufacturing feasibility, safety, compliance, or performance in a physical environment.
Those questions belong to documented technical review, CAD inspection, material review, physical samples, suitable measurements, or testing. The render's role is narrower: it helps a team inspect and discuss a visual direction.
The Next Verification Step
After selecting the more readable direction, keep the paired images and record the visible reason. Name the affected feature: silhouette, highlight flow, edge break, transition, control separation, or massing.
Route geometry and proportion questions to CAD review. Route finish specification and appearance targets to material review. Route mechanisms, interfaces, and clearances to engineering review. Use physical evaluation for questions about real surface and lighting behavior, and confirm any external reference before carrying it into the next presentation.
Under the matched lighting setup, the useful conclusion is specific: this finish makes this feature easier to inspect for this review decision. Keep broader material and production questions open until the next documented artifact can answer them.
Sources
- Visual discrimination of optical material properties: A large-scale study
- Naturally glossy: Gloss perception, illumination statistics, and tone mapping
- The influence of Fresnel effects on gloss perception
- A systematic approach to testing and predicting light-material interactions
- Visually Significant Dimensions and Parameters for Gloss
- Overall gloss evaluation in the presence of multiple cues to surface glossiness
- Assessing gloss under diffuse and specular lighting
- Color and gloss constancy under diverse lighting environments